![]()

This is the second time we’re using Raspberry Pi with an API!
This time, we’ll use the Twitter API to create a tool that will automatically post information to Twitter. To recreate bot-like functionality, it’s necessary for the device to be constantly on, so the energy-efficient Raspberry Pi will be perfect for this job! We’ll create a tool that will tweet news we’re getting from an RSS feed.
We’ll create a PHP program that uses the Twitter API to post tweets. Since we’re using an API, we should be able to implement a program that was tested in a Windows environment. However, since we’re using Raspberry Pi, we’ll have to see how that works out for us!
Nothing is simple, right? Now, let’s start the trial-and-error process with our electronic kit!
There are two steps involved in creating an application for Twitter:
First, let’s register a Twitter account!
If you already have an account, then feel free to proceed to the next step. If you don’t have an account yet, please create one on the Twitter website.
To create an account, you only need an email address, but if you wish to register an application, you’ll need to authenticate your phone number as well. They will send you an authentication code via SMS, so you’ll be able to register your phone number using SMS.
Now that you have an account, let’s register an application!
Twitter Application Management
If you aren’t already logged in to Twitter, you’ll need to input your login credentials on this page.

Figure 1
This is the first page. If you have already registered an application, then you will see it here.
Click on “Create New App” to register a new application!

Figure 2
The required inputs are the application’s Name, Description, and Web Site URL. The application name must be unique. The URL is required, but this information will not be published on the WEB. So, you can just input the address of your twitter page if you’d like. That isn’t currently a problem (as of May, 2015).
The terms of use are written at the bottom of the page, so check the “Yes, I agree” box and then click on the “Create your Twitter application” button. You won’t be able to continue past this point unless you input your phone number.
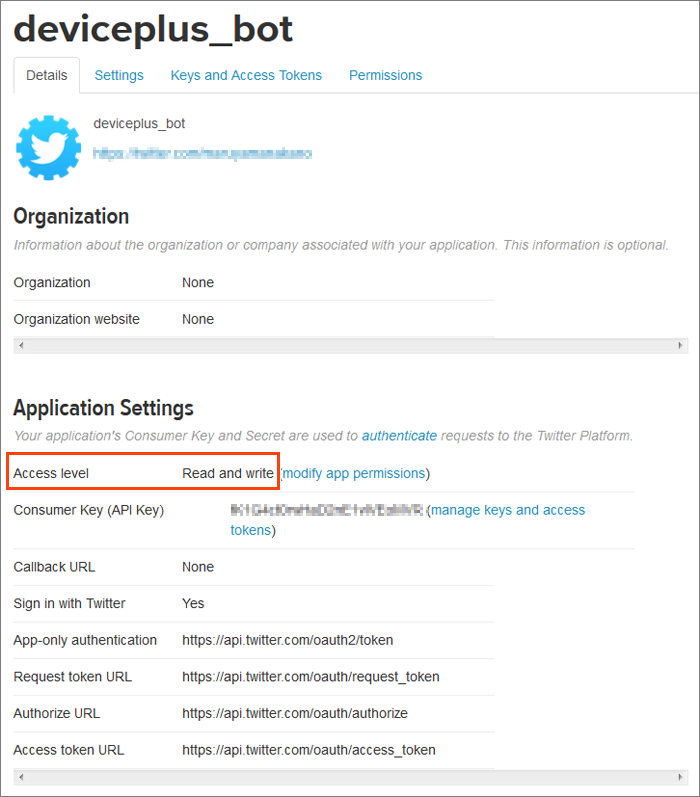
Figure 3
If all went well, you’ll see this page!
At this point, let’s confirm our access level. Our application will tweet posts, so it will be sufficient to select “Read and write.” When I tested this process, this value was the default value. If you’d like to change the value, then you can click on the “modify app permission” link or access the “Permissions” tab at the top of the page to access the settings screen.

Figure 4
Next, click the “Keys and Access Tokens” tab.
On this screen you can obtain the keys that you’ll need to use the API. There are four types of keys. All are randomly generated and alphanumeric.
The “Consumer Key” and “Consumer Secret” are displayed on the page from the start, but you’ll need to generate the “Access Token” and “Access Token Secret.”
Just click the “Create my access token” button on the bottom of the page!

Figure 5
After clicking, your keys will appear on the “Your Access Token” line.
The preparations are now complete! Make a note of each key and then we’ll get started with the programming!
Let’s now try to post something to Twitter!
For authentication, we’ll use the “TwitterOAuth” library that is available on Twitter
The current version available (as of May, 2015) is ver.0.5.3. Please note that the way of using the library may differ depending on the version.
TwitterOauth
This is the public site. You’ll find documentation on using the API there. The method for using it in a program can be found at the top where it says “Installation.” Also, we’ll refer to the “POST” section to achieve our current goal.
Import the TwitterOAuth class.
|
1 2 |
require "vendor/autoload.php"; use AbrahamTwitterOAuthTwitterOAuth; |
The point is in these two lines. “autoload.php” will, as the name suggests, load all required files. Be sure to edit the paths to reflect your current environment.
The following is a program that will post a set phrase to Twitter.
/var/www/news/tweet.php
|
1 2 3 4 |
<!--?php require_once("/var/www/news/twitteroauth/autoload.php"); use AbrahamTwitterOAuthTwitterOAuth; //create message $message = 'Test Post!'; //Authentication $consumerKey = '*****'; $consumerSecret = '*****'; $accessToken = '*****'; $accessTokenSecret = '*****'; $connection = new TwitterOAuth($consumerKey, $consumerSecret, $accessToken, $accessTokenSecret); //Post $statues = $connection->post('statuses/update', array('status' => $message)); //Result if(isset($statues->errors)){ //Error foreach($statues->errors as $err){ echo '[Error Message]'.$err->message.PHP_EOL; } }else{ echo '[Post Complete]'.$statues->text.PHP_EOL; } </pre> <p style="text-align: justify;">Please replace the “*****” sections with the keys that you got when you registered the Twitter application.<br ?--> If the content is posted successfully, then the content will be echoed, and if an error occurs, an error message will be displayed. I tested the program in a windows environment (xampp), and everything worked smoothly! Next, I tried it using Raspberry Pi, but it didn’t work! |

Figure 6
Using the previous source on Raspberry Pi resulted in a flood of error messages on the command line!
PHP Notice: Use of undefined constant CURLOPT_CAINFO - assumed ‘CURLOPT_CAINFO’ in /var/www/news/twitteroauth/src/TwitterOAuth.php on line 296
In this manner, the “undefined constant” errors go on and on.
PHP Fatal error: Call to undefined function AbrahamTwitterOAuthcurl_init() in /var/www/news/twitteroauth/src/TwitterOAuth.php on line 340
Finally, we ran into an undefined function and the program terminated.
These errors originate in TwitterOAuth.php and refer to the cURL library used for sending and receiving data. The reason the “curl_init” cannot be found is not a problem coming from the program, but coming from the environment.
If you look into it, you will find that in order to use cURL, a separate package called “php5_curl” must be installed. (Thinking back, I recall that I had to adjust the php.ini file to use cURL in the xampp environment as well…)
Debian — Details of package php5-curl in sid
The CURL library allows you to get files from FTP, GOPHER, and HTTP servers.
PHP (Hypertext Preprocessor) is a widely used open-source scripting language, particularly well-suited for web development, that can be embedded in HTML.
Well then, let’s give it another try!
Install command:
apt-get install php5-curl
In my environment, by simply installing this package I was able to use cURL. I was a bit surprised that I didn’t even need to reboot! (Maybe it does this automatically?)
Execution command
php /var/www/news/tweet.php
![]()
Figure 7
It worked!!
Now, if we take a look at Twitter…

Figure 8
It posted properly!
Let’s try to post the same message again.
![]()
Figure 9
A “Status is a duplicate” error message was generated. This functionality is provided by Twitter.
Twitter Help Center | Unable to tweet
If you see a “Whoops, you already said that” error message when you post a Tweet, you’ve posted the exact same text in another Tweet recently, and should try writing something new in your next Tweet.
This isn’t just when using the API. You’ll get the same error message if you try to post duplicate content from the Twitter page. You will find more information about posting on the Twitter Limits page, so please familiarize yourself with them when posting automatically!
For now, this completes our efforts to connect Raspberry Pi with the Twitter API.
There are already many bot creation services, but it certainly is interesting to use Raspberry Pi to tweet for us. Let’s enjoy the DYI spirit and create some interesting electronic projects! Maybe, we could use it to tweet information like temperature or humidity!
Next time, we’ll attempt to obtain information via RSS, and then post it to Twitter. To automatically post information at set intervals, we will need to set up a cron, manage our posts, and make minor changes in our environment. Let’s take it step by step!